How to Crochet a Magic Circle for Beginners (The Easiest Method Step by Step)

If you’re learning to crochet, the magic circle is one of those techniques that feels impossible the first time you try it. A lot of beginners struggle with it and honestly, that’s completely normal. It takes a bit of practice to get into your hands, but once it clicks it becomes something you do without even thinking about it.
The good news is that learning the real magic circle is absolutely worth the effort. It gives your projects a much cleaner finish, especially when you’re working on hats, granny squares, coasters and amigurumi toys. Instead of ending up with a big visible hole in the centre of your work, the magic circle pulls completely closed.
In this guide we’ll go through every single step slowly, cover all the important terms, and talk through some of the common mistakes along the way so you can feel confident from start to finish.
Skills You Should Already Know Before Learning the Magic Circle
The magic circle is technically a beginner technique, but it does help to have a few basics already under your belt before trying it.
Before working through this tutorial, you should be comfortable with:
- Holding a crochet hook comfortably
- Yarning over (YO)
- Pulling up a loop
- Making a single crochet (SC)
If those feel familiar, you’re ready to tackle the magic circle.
And if you don’t get it on the first attempt, please don’t stress about it. The magic circle is one of the trickier things beginners learn in crochet, and almost everyone needs a few practice rounds before it starts feeling natural.
What Is a Magic Circle in Crochet?
A magic circle, sometimes also called a magic ring, is an adjustable loop that you crochet directly into at the start of a project. Once your stitches are done, you pull on the yarn tail to close the centre completely.
This technique shows up in loads of crochet projects that are worked in rounds. You’ll commonly see it used in:
- Amigurumi toys
- Hats
- Granny squares
- Coasters
- Mandalas
- Flowers
- Circular bags
- Decorative motifs
Once you know how to make one, you’ll find yourself using it constantly.
Why Use a Real Magic Circle Instead of a Chain Loop?
A lot of beginner tutorials teach a shortcut where you chain two or four stitches and crochet into that loop instead. That method is definitely easier to get the hang of, but it usually leaves a noticeable hole right in the centre of your work.
The real magic circle works differently. Because the loop is adjustable, you can pull it completely shut after your stitches are in place.
That means:
- No large hole in the middle
- A cleaner, neater finished project
- Better results for amigurumi and stuffed toys
- More professional looking crochet overall
It might take a few extra practice attempts, but learning the real method from the beginning is worth it.
Materials You’ll Need
The nice thing about learning the magic circle is that you don’t need anything special.
For beginners, these are the best options to start with:
- Medium weight (worsted weight/#4) yarn in a light colour
- A 5 mm (H-8) crochet hook
- Scissors
- A yarn needle for weaving in ends later
You can use whatever yarn your actual project calls for, but light-coloured yarn makes it so much easier to see your stitches while you’re learning. Dark or fuzzy yarn can make everything significantly harder than it needs to be at this stage.
Crochet Terms You Should Know First
Before jumping in, let’s make sure a few key terms are clear.
Working yarn: The strand that stays attached to your yarn ball.
Yarn tail: The short, loose end of the yarn.
Yarn over (YO): Wrapping the working yarn over your crochet hook.
Single crochet (SC): One of the most common crochet stitches, and the one we’ll be using in the practice example.
If those four terms make sense to you, you’re ready to get started.
Before You Begin
The magic circle can feel awkward during your first few attempts and that’s completely okay.
Your fingers might not quite know where to hold the yarn yet. The loop might come apart a few times. You might accidentally pull the wrong strand and undo the whole thing.
None of that is a problem.
Almost every single crocheter struggles with the magic circle at the beginning. After you’ve practiced it a handful of times, your hands start remembering the movements on their own and everything gets much easier.
The key is to go slowly and just focus on one step at a time.
How to Make a Magic Circle Step by Step
Step 1: Hold the Yarn Correctly
Start by holding the yarn tail in your right hand. The working yarn, the strand attached to the yarn ball, should stay on your left side.

Keeping these two strands separate makes every step that follows considerably easier.
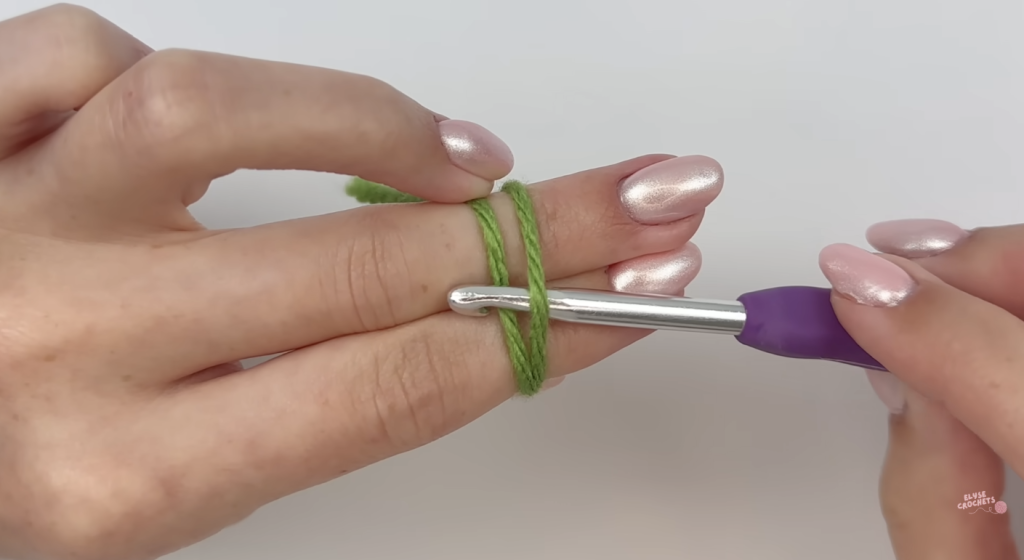
Step 2: Wrap the Yarn Around Two Fingers
Take your index and middle fingers on your left hand and wrap the yarn around both of them once. You should now have two strands laying across your fingers.
Step 3: Make an X Shape
This part is really important.
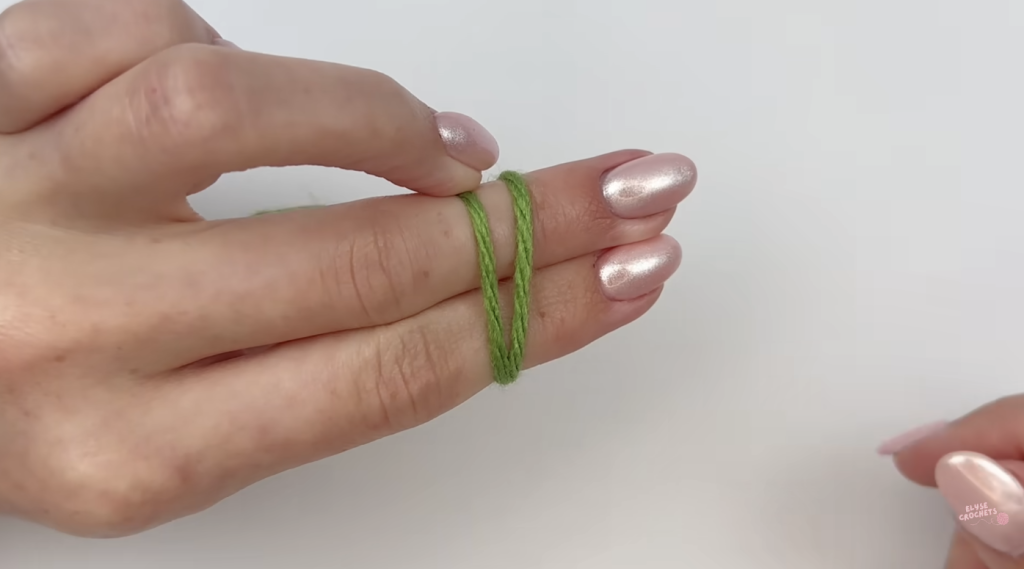
The two strands need to cross each other so they form an X shape on the front of your fingers. The working yarn should sit in front, while the yarn tail sits behind it.
If the strands don’t cross properly, the magic circle won’t work the way it should.
Step 4: Hold Everything in Place
Use your ring finger to pinch the yarn tail against your palm. This keeps the loop from falling apart while you work through the next steps.
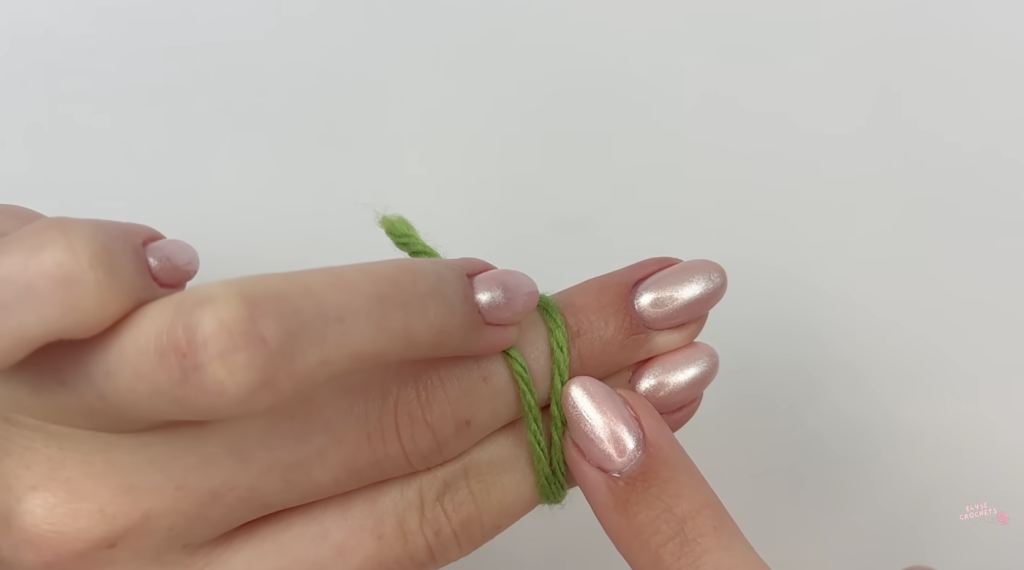
At this point you should be looking at:
- Two fingers wrapped with yarn
- An X where the strands cross
- The working yarn leading out toward the yarn ball
- A short yarn tail hanging loose
If your setup looks like that, you’re doing great.
Step 5: Insert the Hook Under the First Strand
Take your crochet hook in your right hand. Slide it under the front strand of yarn, then move it over the second strand sitting behind it.
This motion feels a little strange the first few times, but it gets easier quickly.
Step 6: Grab the Back Strand
Use your hook to catch the second strand of yarn, the one connected to the yarn tail. Carefully pull that strand underneath the front strand.
You should now have a small loop sitting on your crochet hook.
Be careful not to pull the entire tail all the way through, or you’ll need to start again from scratch.
Step 7: Insert the Hook into the New Loop
Place your hook back through the loop you just created. Hold everything gently so it doesn’t come undone while you move to the next step.

At this point everything is still quite loose and that’s perfectly fine.
Step 8: Turn Your Hand and Remove Your Fingers
Rotate your left hand so your palm faces the opposite direction. While holding the loop carefully with your right hand, gently slide your two fingers out.
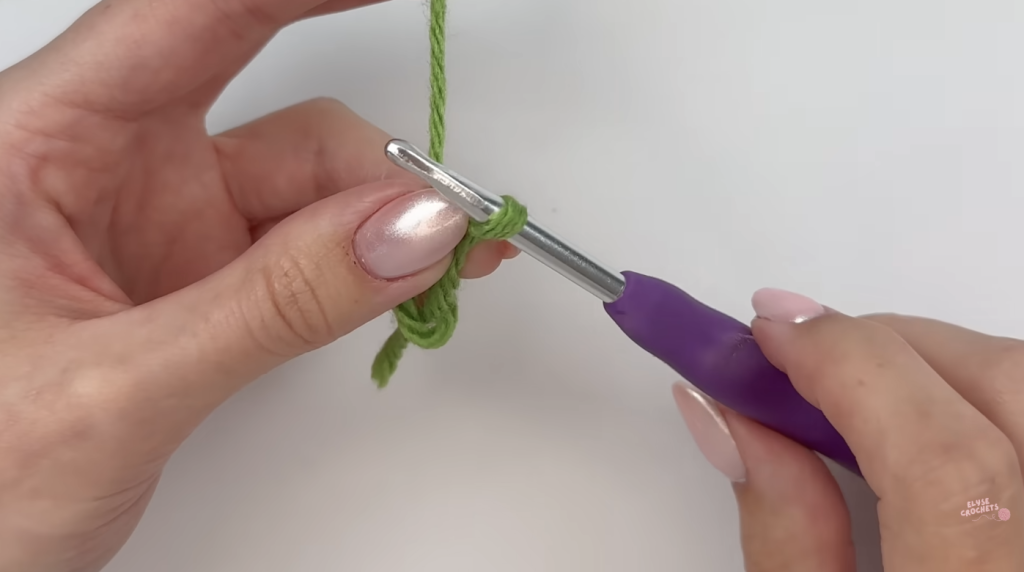
You now have a large adjustable loop hanging below your crochet hook.
Congratulations, you’ve just created the foundation of your magic circle.
Step 9: Secure the Ring with One Chain
Hold the loop with your left hand. Yarn over with the working yarn and pull that yarn through the loop on your hook.
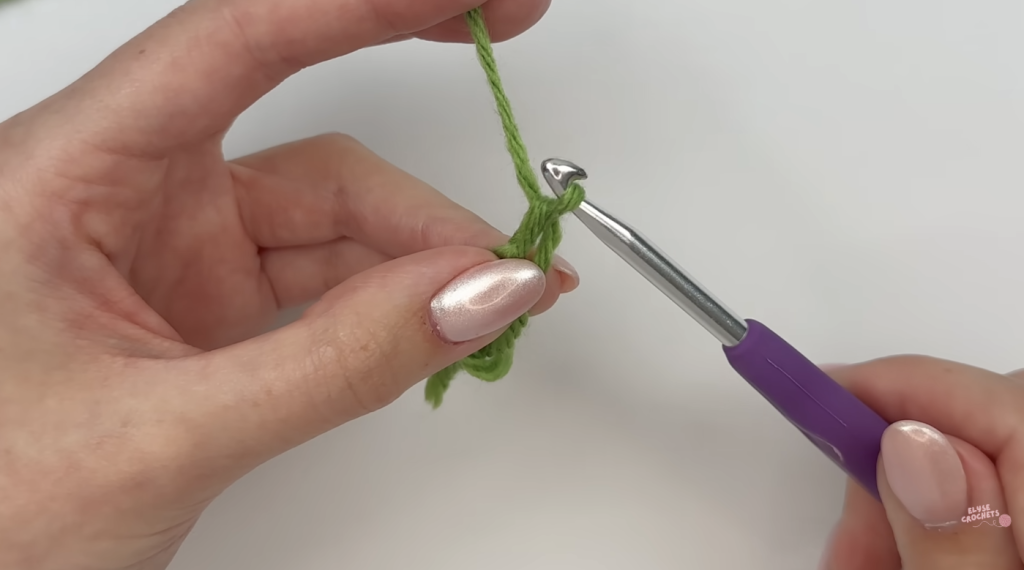
This creates one chain stitch.
Here’s something worth remembering: this chain usually doesn’t count as a stitch. It just secures the magic circle so you can start crocheting into it properly. Always check your specific pattern, but in most cases, you won’t count this chain as part of your stitch total.
What You Should See After Creating the Ring
After removing your fingers from the loop and making the securing chain, take a moment to check how things look.
You should see:
- One large adjustable loop hanging below your hook
- One short yarn tail
- One working yarn connected to your yarn ball
- One securing chain on your hook
If everything looks like that, you’re on the right track.
If the loop disappeared or fell apart, don’t get discouraged. Just start over and try again. This happens to every single crocheter while learning the magic circle.
How to Crochet into the Magic Circle
Now that your ring is secure, it’s time to start making stitches.
For practice, we’re going to work 6 single crochets into the magic circle. This is one of the most common ways to begin amigurumi projects.
Keep in mind that some patterns will ask for 8, 10 or even 12 stitches. The method stays exactly the same regardless, only the stitch count changes.
Step 10: Make Your First Single Crochet
Insert your hook into the centre of the large loop, making sure you’re going through the actual middle of the ring rather than just under one strand of yarn.
Yarn over with the working yarn and pull up a loop. You should now have two loops sitting on your hook. Yarn over again and pull through both loops.
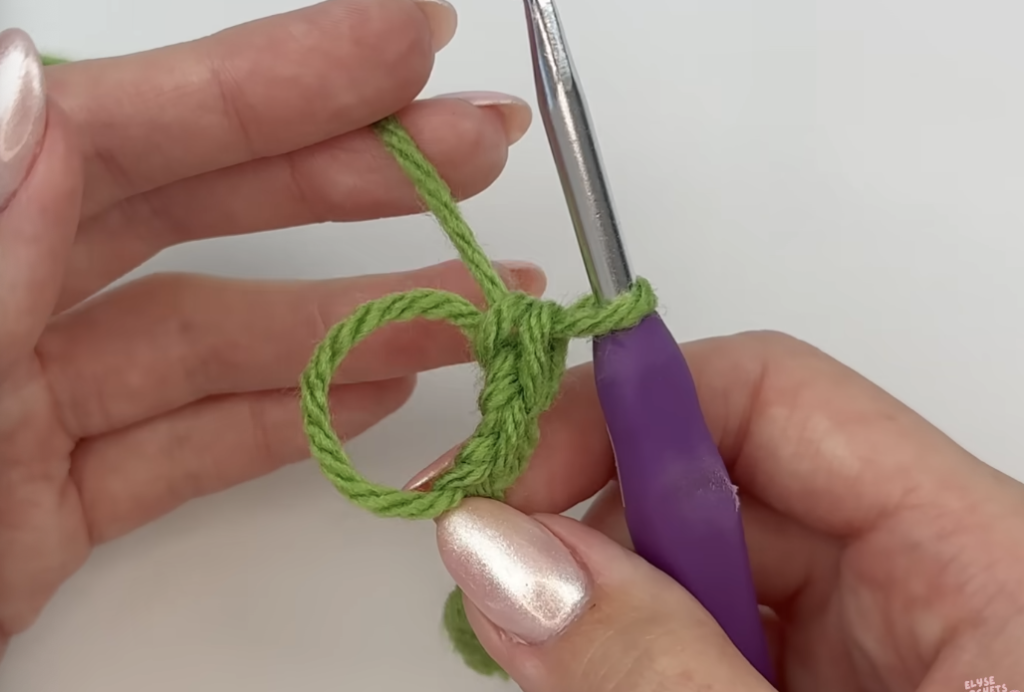
You’ve just made your first single crochet into the magic circle.
This first stitch is important because it helps lock the magic circle in place. Once it’s done, the loop is much less likely to come undone while you continue working.
Step 11: Continue Making Single Crochets
Insert your hook into the centre of the ring again. Yarn over and pull up a loop. Yarn over once more and pull through both loops.
That’s two single crochets.
Keep repeating that exact process until you have a total of six single crochets in your magic circle.
Take your time here. The stitches can feel a bit crowded at first, but that’s completely normal and nothing to worry about.
Quick Stitch Check
Before moving forward, count what you have. You should see:
- 6 single crochets
- One loose yarn tail
- One working yarn connected to your yarn ball
- A large opening in the centre that hasn’t been tightened yet
If everything looks right, you’re ready for the best part.
How to Close the Magic Circle
This is the part that makes the magic circle so useful and satisfying.
Grab the short yarn tail with your fingers and gently pull on it. You’ll see the centre hole begin to shrink as you pull. Keep going until the opening closes completely.
Sometimes you’ll need to pull a little more firmly. If nothing seems to be happening, you’re probably pulling the working yarn instead of the yarn tail.
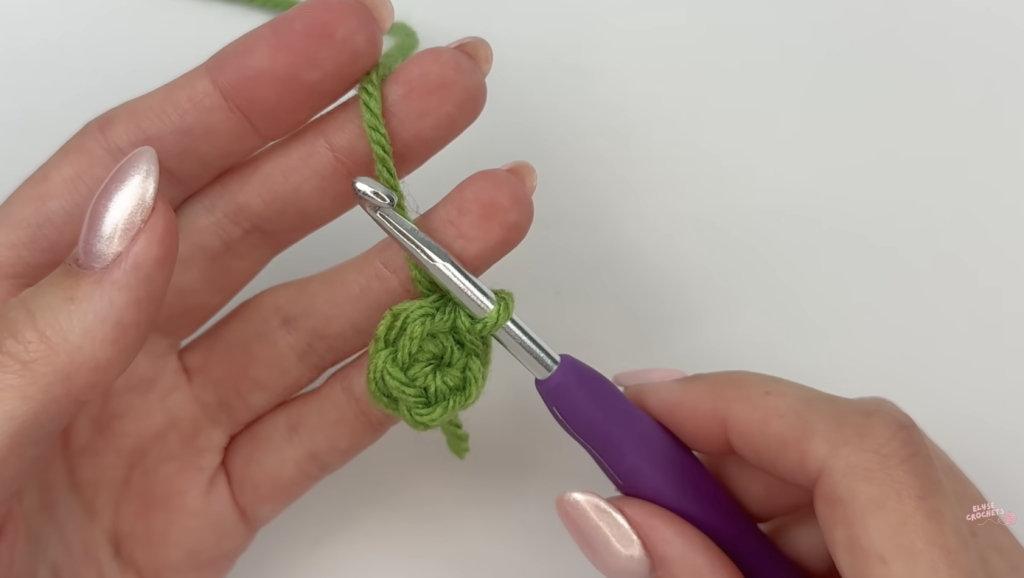
Once it’s tightened properly, the centre should close neatly with little to no visible hole remaining.
And that right there is exactly why so many crocheters prefer a real magic circle over the chain loop method.
Finishing the First Round
After closing the centre, you’ll usually finish the round according to whatever pattern you’re following.
Many patterns ask you to make a slip stitch into the first single crochet to join the round neatly. Others use continuous rounds and skip the slip stitch entirely.
Always follow your specific pattern instructions for this part.
For practice purposes, you can insert your hook into the first single crochet, yarn over, and pull through both the stitch and the loop on your hook to create a slip stitch.
Your first round is now complete.
Practice Exercise for Beginners
The best way to get the magic circle into your muscle memory is repetition.
Try this simple exercise a few times in a row:
- Make a magic circle
- Crochet 6 single crochets into the ring
- Pull the tail to close the centre
- Join with a slip stitch
- Undo everything and repeat from the beginning
After three or four rounds of this, the whole process starts feeling considerably more natural.
You’ll probably still make mistakes and that’s fine. Every single crocheter has been exactly where you are right now.
Common Magic Circle Mistakes (And How to Fix Them)
My magic circle keeps falling apart
This usually happens before the first stitch is made. Try holding the crossing point firmly with your fingers until you’ve completed that first single crochet. Once that first stitch is in place, the ring becomes much more stable.
My circle won’t close
Double check that you’re pulling the yarn tail and not the working yarn. The yarn tail is the short piece that isn’t attached to your yarn ball. If you pull the right strand, the centre should tighten up immediately.
I still have a hole in the middle
A very tiny opening is completely normal, but a large hole usually means the ring wasn’t tightened enough. Pull the tail a little more firmly. If the hole still won’t close, you may have accidentally created a chain loop instead of a true magic circle.
I pulled the tail all the way out
Don’t panic, this happens to almost everyone while learning. Just start over and try again. After a few attempts you’ll naturally develop a feel for how much tension to use.
My stitches feel too tight
Beginners often crochet more tightly than they realize without noticing. Try relaxing your grip slightly. Keeping your stitches a little looser. It makes working into the centre ring significantly easier.
Tips for Learning the Magic Circle Faster
Use light coloured yarn when you’re practicing. Dark yarn makes it difficult to see where your hook should go.
Practice with medium weight yarn before moving to thinner or fancier yarns. Chunky or novelty yarn can hide the stitches and make learning way harder than it needs to be.
Slow down and focus on accuracy rather than speed. The goal right now is building muscle memory. Speed comes naturally once the movements feel familiar.
And most importantly, give yourself real permission to make mistakes. Nobody masters the magic circle on their first try, and most people don’t get it on their second or third attempt either.
Don’t Forget to Secure the Yarn Tail
Once you’ve worked a few more rounds in your actual project, take a moment to properly secure the tail.
Thread the yarn tail onto a yarn needle and weave it through several stitches on the back side of your work. Then trim any excess yarn.
This extra step helps keep the centre tightly closed over time, which matters especially for projects that get handled a lot like toys and bags.
Beginner Magic Circle Tips
A few small things that make learning this easier.
Use light coloured yarn whenever you can. Dark yarn makes it so much harder to see individual stitches, especially while you’re still developing your eye for them.
Keep your stitches slightly loose while you’re practicing. Tight stitches make the centre ring harder to work into and tend to cause a lot of frustration early on.
Practice making six single crochets into a magic circle several times before starting any real project. Repeating the process is honestly what builds the muscle memory that makes it feel automatic.
And above all, be patient with yourself. Every experienced crocheter struggled with the magic circle at some point. It feels awkward and fiddly at first, but after a few rounds of practice it does become second nature.
Final Thoughts
The magic circle is one of those crochet skills that feels challenging at first and then one day just clicks, and suddenly it feels easy. It creates a clean, professional looking centre without leaving a big hole behind, which is exactly why it shows up in everything from amigurumi animals to hats, flowers and granny squares.
If your first few attempts don’t go well, please don’t get discouraged. Keep practicing, go slowly, and trust that the process is working even when it doesn’t feel like it.
Before long you’ll be making magic circles without thinking twice about them, and you’ll probably find yourself wondering why it ever seemed so difficult in the first place.